一. 容器概述
容器:泛指可以存放其他物品的一种容纳工具,部分和完全封闭的
1. 程序运行环境
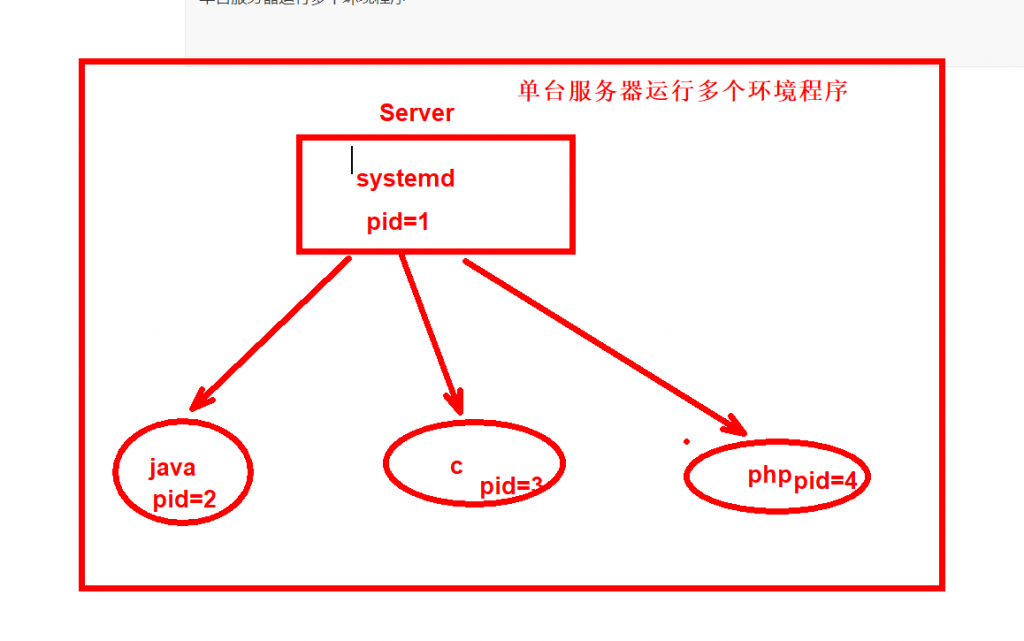

2. 容器的资源隔离
怎么实现:
1.通过虚拟化实现
2.通过容器实现

容器实现名称空间隔离   NameSpace   资源隔离
PID   进程编号                     2.6.24+  #内核版本
NET   网络设备、网络协议栈 端口等         2.26.29+
IPC   信息量 消息队列 共享内存          2.6.19+
Mount  文件系统  挂载点               2.4.19+
UTS    主机名和主机域               2.6.19+
USER   操作进程的用户和用户组          3.8+

# 查看内核版本是否在3.8以上
[root@docker01 ~]# uname -r
3.10.0-957.el7.x86_64
容器的由来
“Docker”一词来自英国口语,意为码头工人(Dock Worker),即从船上装卸货物的人。

Docker借鉴集装箱概念,集装箱装载货物,而容器装载软件,开发负责往容器内部部署代码(装箱),运维负责让容器可以在不同环境运行(运输)

两大特性:
build  once  run  Anywhere   #一次构建,随处运行(只要将软件放入容器内,就可以在不同环境运行)——可移植
configure once run Anything   #一次配置,运行所有(只要runtime环境配置完成,即可运行所有容器)——便捷

一个容器包含了完整的运行环境:除了应用程序本身以外,将所需的依赖、库、二进制文件、配置文件 都统一打包到一个叫容器镜像的包中
3. 容器优缺点
容器的优点
灵活:即使最复杂的应用程序也可以容器化。
轻量级:容器利用并共享主机内核,在系统资源方面比虚拟机效率更高。
可移植性:您可以在本地构建,部署到云并在任何地方运行。
松散耦合:容器是高度自给自足并封装的容器,使您可以在不破坏其他容器的情况下更换或升级它们。
可扩展:您可以在数据中心内增加并自动分布容器副本。
安全:容器将积极的约束和隔离应用于流程,而无需用户方面的任何配置。
标准化
版本控制
降低学习成本(只需要下载需要的软件、环境镜像)


容器缺点
1.复杂性增加      平台工具   k8s   Mesos
2.不成熟   随着时间,这个就是不是问题
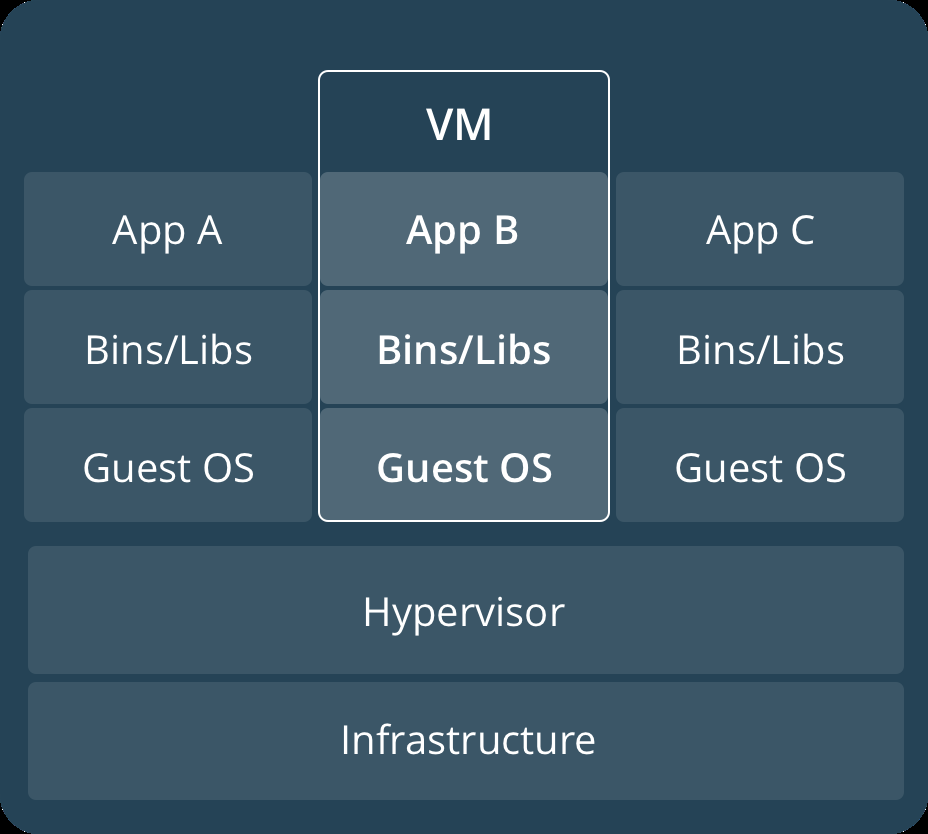
4. 容器和虚拟化区别
容器化和虚拟化区别
    相对于虚拟机来说更加的轻量级
    构建一套能够不依赖于具体环境而运行的应用程序
    虚拟化需要hypervisor作为虚拟机监视器中间层,虚拟机启动都是hypervisor进行分配资源
    容器不需要hypervisor


二. Docker安装部署
'Docker是基于容器技术的轻量级虚拟化的解决方案 '
容器引擎: 基于go语言实现的

Docker引入了一整套容器管理的生态系统:包括分层的镜像模型,容器的注册库,API,C/S架构,容器,镜像.
容器是隔离的,但是共享操作系统和适当的库和二进制文件: bins lib
https://docs.docker.com/engine/install/centos/
企业版EE   支持12个月的技术支持
社区版CE   只支持4个月的技术支持

2017年第一季度 使用YY.MM-xx格式
Docker-1.13  老格式
4G内存    >50G硬盘
1. 环境配置
[root@docker01 ~]# iptables-save

[root@docker01 ~]# getenforce
Disabled

[root@docker01 ~]# date
Tue Jun  2 11:26:13 CST 2020

# 查看内核版本是否在3.8以上
[root@docker01 ~]# uname -r
3.10.0-957.el7.x86_64

[root@docker01 ~]# cat /etc/redhat-release
CentOS Linux release 7.6.1810 (Core)

[root@docker01 ~]# ping baidu.com
PING baidu.com (220.181.38.148) 56(84) bytes of data.
64 bytes from 220.181.38.148 (220.181.38.148): icmp_seq=1 ttl=128 time=38.1 ms

[root@docker01 ~]# ll /etc/yum.repos.d/
total 8
-rw-r--r--. 1 root root 2523 2019-05-08 18:36 CentOS-Base.repo
-rw-r--r--. 1 root root  664 2019-05-08 18:36 epel.repo
#查看yum包中是否有docker软件
[root@docker01 ~]# yum list docker --show-duplicates
yum默认有1.13版本的
2. 设置存储库
#使用存储库安装
在新主机上首次安装Docker Engine之前,需要设置Docker存储库。之后,您可以从存储库安装和更新Docker。

#设置存储库
安装yum-utils软件包(提供yum-config-manager 实用程序)并设置稳定的存储库。
[root@docker01 ~]# yum install -y yum-utils

安装完yum-utils后可以使用管理命令来增加一个docker源仓库
[root@docker01 ~]# yum-config-manager \
   --add-repo \
   https://download.docker.com/linux/centos/docker-ce.repo

# 检查版本
[root@docker01 ~]# yum list docker-ce    --show-duplicates

# 不指定版本的话默认安装最新版本
[root@docker01 ~]# yum install -y  docker-ce

# 启动
[root@docker01 ~]# systemctl  start docker.service
[root@docker01 ~]# systemctl  enable  docker.service

# 手动配置docker
 [root@docker01 ~]# vim /etc/docker/daemon.json
{
"graph": "/data/docker",        #指定工作目录
"storage-driver": "overlay2",   #存储驱动
"insecure-registries": ["registry.access.redhat.com","quay.io"],    #仓库
"registry-mirrors": ["https://q2gr04ke.mirror.aliyuncs.com"], #镜像加速源
"bip": "172.0.181.1/24",            #docker容器IP地址(中间两位采用主机后两位)
"exec-opts": ["native.cgroupdriver=systemd"],       #本地的驱动
"live-restore": true            #docker服务以外重启时容器自启动 故障自动恢复
}


{
"graph": "/data/docker",
"storage-driver": "overlay2",
"insecure-registries": ["registry.access.redhat.com","quay.io"],
"registry-mirrors": ["https://q2gr04ke.mirror.aliyuncs.com"],
"bip": "172.0.181.1/24",
"exec-opts": ["native.cgroupdriver=systemd"],
"live-restore": true
}

[root@docker01 ~]# systemctl  restart docker.service
[root@docker01 ~]# systemctl  status docker.service
这里可能会启动失败.

# 原因:
参考一些说法是自己配置了国内镜像,比如阿里云的docker镜像
比如用了:yum-config-manager --add-repo http://mirrors.aliyun.com/docker-ce/linux/centos/docker-ce.repo

# 解决方法:
如果是配置了国内镜像,并且镜像文件为/etc/docker/daemon.json,则修改文件后缀为.conf即可正常启动docker 服务
mv /etc/docker/daemon.json /etc/docker/daemon.conf
3. 查看docker基本信息
#检查docker版本相关的信息

[root@docker01 ~]# docker version
Client: Docker Engine - Community
 Version:           19.03.8
 API version:       1.40
 Go version:        go1.12.17
...

[root@docker01 ~]# docker info
Client:
 Debug Mode: false
...


#查看镜像
[root@docker01 ~]# docker image ls
REPOSITORY    TAG    IMAGE ID   CREATED  SIZE
[root@docker01 ~]# docker images
REPOSITORY    TAG    IMAGE ID   CREATED  SIZE

#显示所有的容器
[root@docker01 ~]# docker ps -a
CONTAINER ID  IMAGE   COMMAND  CREATED  STATUS  PORTS  NAMES

#启动第一个容器
[root@docker01 ~]# docker run hello-world
To generate this message, Docker took the following steps:

1. The Docker client contacted the Docker daemon.
2. The Docker daemon pulled the "hello-world" image from the Docker Hub.
    (amd64)
3. The Docker daemon created a new container from that image which runs the
    executable that produces the output you are currently reading.
4. The Docker daemon streamed that output to the Docker client, which sent it
    to your terminal.

为了生成这个消息,Docker采取了以下步骤:
1. Docker客户端连接Docker守护进程。
2. Docker守护进程从DockerHub下载“hello-world”镜像。
(amd64)
3.Docker守护进程从运行的镜像创建了一个新容器,镜像运行可执行文件,生成你当前正在读取的输出结果
4. Docker守护进程将输出结果到发送它的Docker客户端,客户端再发送至你的终端。


[root@docker01 ~]# docker images
REPOSITORY          TAG                 IMAGE ID            CREATED             SIZE
hello-world         latest              bf756fb1ae65        5 months ago        13.3kB
[root@docker01 ~]# docker ps -a

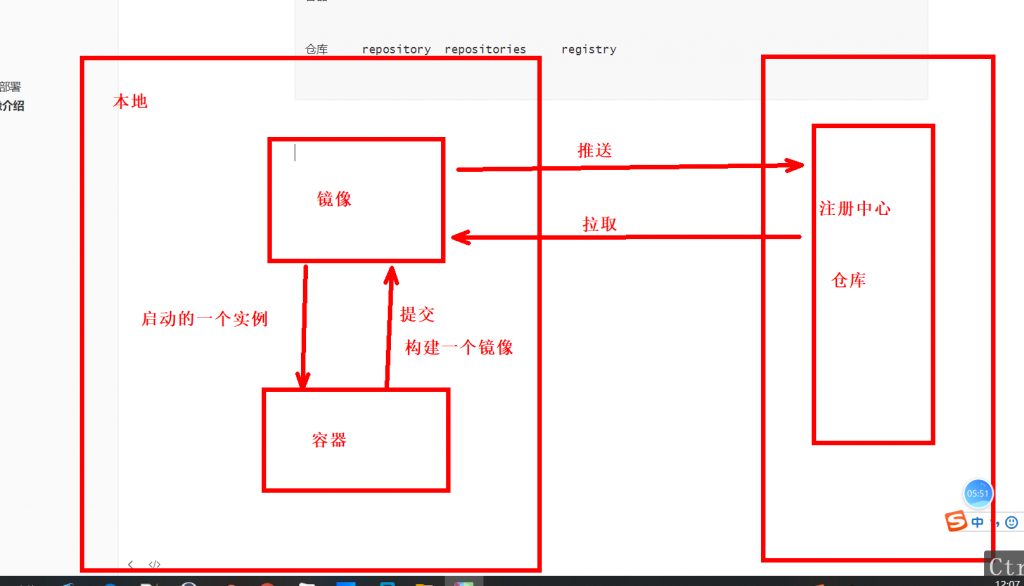
三. Docker镜像介绍
镜像  images
容器  container
仓库  repository  repositories  registry
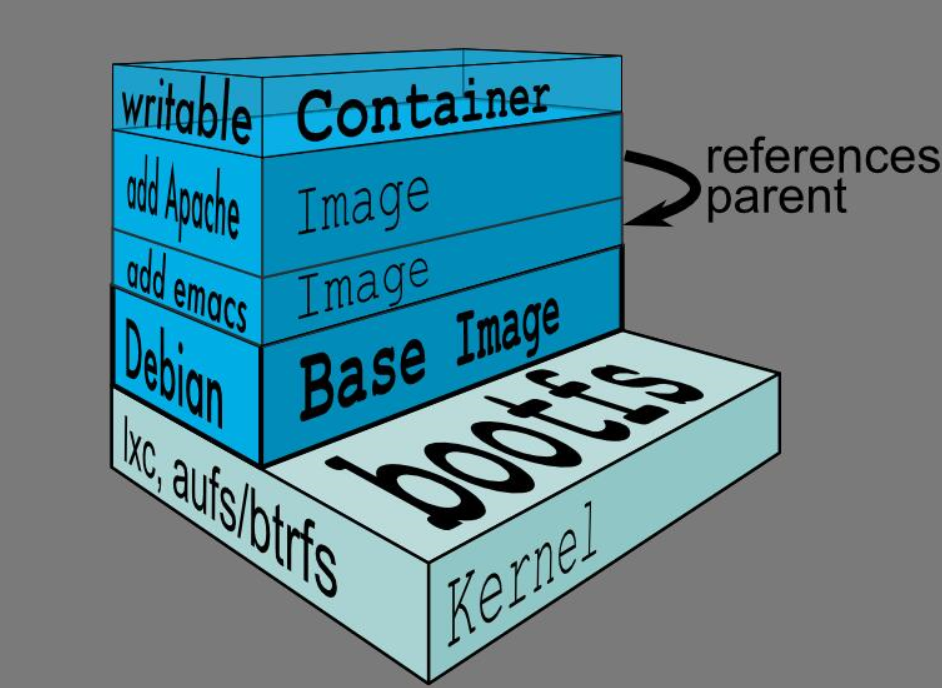
1. 镜像的结构
Docker镜像位于bootfs或者rootfs之上 文件系统
每层镜像的下面一层镜像称为其父镜像(父子关系)
第一层镜像都是为Base image
容器在最顶层
容器是有状态的(running  exited  UP)
其下的镜像的所有层都是readonly
Docker将readonly的fs层称之为image
2. 镜像格式
# 镜像名称格式
注册名/仓库名/镜像名称:版本号
docker.io/library/hello-word:latest
{registry_name}/{repository_name}/{image_name}:{tag_name}
https://hub.docker.com/    ==     https://dockerhub.com/

dockerhub是一个提供docker镜像的仓库,提供了针对每个镜像的解决方案
github  gitee   dockerhub    账户要注册
3. Docker镜像命令使用
#登录docker.io    官方的镜像仓库
[root@docker01 ~]# docker login  docker.io
Login with your Docker ID to push and pull images from Docker Hub. If you don't have a Docker ID, head over to https://hub.docker.com to create one.    '
Username: qls123
Password:
WARNING! Your password will be stored unencrypted in /root/.docker/config.json.
Login Succeeded

[root@docker01 ~]# cat /root/.docker/config.json
{
    "auths": {
        "https://index.docker.io/v1/": {
            "auth": "cWxzMTIzOnF6ajE4MjE3MTE0OTg1"
        }
    },
    "HttpHeaders": {
        "User-Agent": "Docker-Client/19.03.8 (linux)"
    }

#退出登录
[root@docker01 ~]# docker logout
Removing login credentials for https://index.docker.io/v1/

#搜索镜像
[root@docker01 ~]# docker search  alpine

#下载一个镜像
[root@docker01 ~]# docker pull  alpine:3.12.0
3.12.0: Pulling from library/alpine

#下载最新版本
[root@docker01 ~]# docker pull alpine
Using default tag: latest

[root@docker01 ~]# docker images
REPOSITORY          TAG                 IMAGE ID            CREATED             SIZE
alpine              3.12.0              a24bb4013296        3 days ago          5.57MB
alpine              latest              a24bb4013296        3 days ago          5.57MB
hello-world         latest              bf756fb1ae65        5 months ago        13.3kB

#给镜像打标签
[root@docker01 ~]# docker image  tag a24bb4013296   docker.io/qls123/alpine:v3.12.0

[root@docker01 ~]# docker images
REPOSITORY          TAG                 IMAGE ID            CREATED             SIZE
alpine              3.12.0              a24bb4013296        3 days ago          5.57MB
alpine              latest              a24bb4013296        3 days ago          5.57MB
qls123/alpine       v3.12.0             a24bb4013296        3 days ago          5.57MB
hello-world         latest              bf756fb1ae65        5 months ago        13.3kB

#推送镜像到自己的官方仓库
[root@docker01 ~]# docker push docker.io/qls123/alpine:v3.12.0

#删除镜像
[root@docker01 ~]# docker rmi  alpine:latest
Untagged: alpine:latest

#强制删除
[root@docker01 ~]# docker rmi -f hello-world:latest
Untagged: hello-world:latest
Untagged: hello-world@sha256:6a65f928fb91fcfbc963f7aa6d57c8eeb426ad9a20c7ee045538ef34847f44f1
Deleted: sha256:bf756fb1ae65adf866bd8c456593cd24beb6a0a061dedf42b26a993176745f6b

#从私有仓库进行下载镜像
[root@docker01 ~]# docker  pull docker.io/qls123/alpine:v3.10.5
四. Docker容器的基础操作
1. Docker常用命令
#查看本地容器的列表
[root@docker01 ~]# docker ps -a

#启动容器  (运行镜像)
docker run ...

##命令格式
Usage:  docker run [OPTIONS] IMAGE [COMMAND] [ARG...]

选项:
-i      #表示启动一个可交互式的容器 并能持续打开进行输入
-t      #表示使用终端关联到容器的输出输入
-d      #将容器放入到后台运行
--rm    #退出后即删除容器
--name  #给容器起个名字

#启动一个容器
[root@docker01 ~]# docker run -ti  docker.io/qls123/alpine:v3.12.0   /bin/sh
/ # exit #退出

#放入到后台,起个名称
[root@docker01 ~]# docker run -ti -d  --name test  qls123/alpine:v3.12.0   /bin/sh
WARNING: IPv4 forwarding is disabled. Networking will not work.
450574aba73208d0f7612543d49f29cde1f877876145ccb4935eda839d4faf79

#启动一个一次性的容器
[root@docker01 ~]# docker run  --rm  -ti  --name oldboy qls123/alpine:v3.12.0   /bin/sh
WARNING: IPv4 forwarding is disabled. Networking will not work.
/ # exit

#启动一个非交互式的容器
[root@docker01 ~]# docker run -d --name  qls01  qls123/alpine:v3.12.0   /bin/sleep 300
WARNING: IPv4 forwarding is disabled. Networking will not work.
2908f619dfb8e497b522d1d98252cb02e8971c5e5e1d6c4761b1e6bd8aed4ac6
[root@docker01 ~]# docker ps -a | grep qls01
2908f619dfb8        qls123/alpine:v3.12.0   "/bin/sleep 300"    10 seconds ago       Up 9 seconds                                        qls01

#进入容器
[root@docker01 ~]# docker exec -ti 450574aba732 /bin/sh
/ # ls
bin    dev    etc    home   lib    media  mnt    opt    proc   root   run    sbin   srv    sys    tmp    usr    var

[root@docker01 ~]# docker exec -ti test /bin/sh
/ # ls
bin    dev    etc    home   lib    media  mnt    opt    proc   root   run    sbin   srv    sys    tmp    usr    var

#启动和停止容器
[root@docker01 ~]# docker stop qls01
qls01
[root@docker01 ~]# docker ps -a
CONTAINER ID        IMAGE                   COMMAND             CREATED             STATUS                      PORTS               NAMES
2908f619dfb8        qls123/alpine:v3.12.0   "/bin/sleep 300"    5 minutes ago       Exited (0) 1 second ago                         qls01

[root@docker01 ~]# docker start qls01
qls01
[root@docker01 ~]# docker ps -a
CONTAINER ID        IMAGE                   COMMAND             CREATED             STATUS                      PORTS               NAMES
2908f619dfb8        qls123/alpine:v3.12.0   "/bin/sleep 300"    5 minutes ago       Up 2 seconds                                    qls01

[root@docker01 ~]# docker restart qls01
qls01
[root@docker01 ~]# docker ps -a
CONTAINER ID        IMAGE                   COMMAND             CREATED             STATUS                      PORTS               NAMES
2908f619dfb8        qls123/alpine:v3.12.0   "/bin/sleep 300"    6 minutes ago       Up 1 second                                     qls01

#删除容器
[root@docker01 ~]# docker rm f0bdecf06633
f0bdecf06633

#强制删除在运行中的容器
[root@docker01 ~]# docker rm  -f  test
test

#批量删除已经死掉的容器
[root@docker01 ~]# for i in (docker ps -a | grep -i exited |awk '{print1}');do docker rm -f i;done

#删除所有容器
[root@docker01 ~]# docker rm -f(docker ps -a -q)

#修改/提交容器
[root@docker01 ~]# docker run -ti  -d --name  qls01  qls123/alpine:v3.12.0   /bin/sh

[root@docker01 ~]# docker exec  -ti qls01  /bin/sh
/ # ls
bin    dev    etc    home   lib    media  mnt    opt    proc   root   run    sbin   srv    sys    tmp    usr    var
/ # echo "test" >> test.txt
/ # exit

[root@docker01 ~]# docker commit -p qls01  docker.io/qls123/alpine:v3.12.0_create_test.txt
sha256:9d3e1d551a9406db1e4f79e04d38f121a9dbc0d5ed4b63229b613fdde87a6293

[root@docker01 ~]# docker images
REPOSITORY          TAG                       IMAGE ID            CREATED             SIZE
qls123/alpine       v3.12.0_create_test.txt   9d3e1d551a94        6 seconds ago       5.57MB

[root@docker01 ~]# docker run --rm  docker.io/qls123/alpine:v3.12.0_create_test.txt /bin/cat test.txt
test

#导入导出镜像
#删除镜像
[root@docker01 ~]# docker rmi -f  be4e4bea2c2e

#导出镜像
[root@docker01 ~]# docker save a24bb4013296 > alpine_v3.12.0.tar
[root@docker01 ~]# ll
total 97804
-rw-r--r--  1 root root  5853184 2020-06-02 17:12 alpine_v3.12.0.tar

#导入镜像
[root@docker01 ~]# docker load < alpine_v3.12.0.tar
Loaded image ID: sha256:a24bb4013296f61e89ba57005a7b3e52274d8edd3ae2077d04395f806b63d83e

[root@docker01 ~]# docker load  -i  alpine_v3.12.0.tar
Loaded image ID: sha256:a24bb4013296f61e89ba57005a7b3e52274d8edd3ae2077d04395f806b63d83e

[root@docker01 ~]# docker images
REPOSITORY          TAG                 IMAGE ID            CREATED             SIZE
<none>              <none>              a24bb4013296        3 days ago          5.57MB

[root@docker01 ~]# docker tag a24bb4013296 docker.io/qls123/alpine:v3.12.0

[root@docker01 ~]# docker images
REPOSITORY          TAG                 IMAGE ID            CREATED             SIZE
qls123/alpine       v3.12.0             a24bb4013296        3 days ago          5.57MB

#查看容器的日志
[root@docker01 ~]# docker logs d89fb9626085

[root@docker01 ~]# docker logs -f  d89fb9626085
2. 报错总结
1.删除不了正在运行中的容器
[root@docker01 ~]# docker rm  test
Error response from daemon: You cannot remove a running container 450574aba73208d0f7612543d49f29cde1f877876145ccb4935eda839d4faf79. Stop the container before attempting removal or force remove
##解决方法:
(1).-f强制删除
(2).停止容器后删除

2.IPV4转发未开启
[root@docker01 ~]# docker run --rm  docker.io/qls123/alpine:v3.12.0_create_test.txt /bin/cat test.txt
WARNING: IPv4 forwarding is disabled. Networking will not work.
##解决方法:
[root@docker01 ~]# echo "net.ipv4.ip_forward = 1"  >> /etc/sysctl.conf
[root@docker01 ~]# sysctl  -p

3.在进行push操作时,镜像格式有问题
denied: requested access to the resource is denied
##解决方法:
给自己镜像命名的时候格式应该是: docker注册用户名/镜像名,比如我的docker用户名为 test123,那么我的镜像tag就为 test123/whalesay,不然是push不上去的
3. Docker help文档
[root@zabbix ~]# docker --help

Usage:  docker [OPTIONS] COMMAND

A self-sufficient runtime for containers

Options:
      --config string      Location of client config
                           files (default "/root/.docker")
  -c, --context string     Name of the context to use to
                           connect to the daemon
                           (overrides DOCKER_HOST env var
                           and default context set with
                           "docker context use")
  -D, --debug              Enable debug mode
  -H, --host list          Daemon socket(s) to connect to
  -l, --log-level string   Set the logging level
                           ("debug"|"info"|"warn"|"error"|"fatal") (default "info")
      --tls                Use TLS; implied by --tlsverify
      --tlscacert string   Trust certs signed only by
                           this CA (default
                           "/root/.docker/ca.pem")
      --tlscert string     Path to TLS certificate file
                           (default "/root/.docker/cert.pem")
      --tlskey string      Path to TLS key file (default
                           "/root/.docker/key.pem")
      --tlsverify          Use TLS and verify the remote
  -v, --version            Print version information and quit

Management Commands:
  builder     Manage builds
  config      Manage Docker configs
  container   Manage containers
  context     Manage contexts
  engine      Manage the docker engine
  image       Manage images
  network     Manage networks
  node        Manage Swarm nodes
  plugin      Manage plugins
  secret      Manage Docker secrets
  service     Manage services
  stack       Manage Docker stacks
  swarm       Manage Swarm
  system      Manage Docker
  trust       Manage trust on Docker images
  volume      Manage volumes

Commands:
  attach      Attach local standard input, output, and error streams to a running container
  build       Build an image from a Dockerfile
  commit      Create a new image from a container's changes       '
  cp          Copy files/folders between a container and the local filesystem
  create      Create a new container
  diff        Inspect changes to files or directories on a container's filesystem'
  events      Get real time events from the server
  exec        Run a command in a running container
  export      Export a container's filesystem as a tar archive
  history     Show the history of an image
  images      List images
  import      Import the contents from a tarball to create a filesystem image
  info        Display system-wide information
  inspect     Return low-level information on Docker objects
  kill        Kill one or more running containers
  load        Load an image from a tar archive or STDIN
  login       Log in to a Docker registry
  logout      Log out from a Docker registry
  logs        Fetch the logs of a container
  pause       Pause all processes within one or more containers
  port        List port mappings or a specific mapping for the container
  ps          List containers
  pull        Pull an image or a repository from a registry
  push        Push an image or a repository to a registry
  rename      Rename a container
  restart     Restart one or more containers
  rm          Remove one or more containers
  rmi         Remove one or more images
  run         Run a command in a new container
  save        Save one or more images to a tar archive (streamed to STDOUT by default)
  search      Search the Docker Hub for images
  start       Start one or more stopped containers
  stats       Display a live stream of container(s) resource usage statistics
  stop        Stop one or more running containers
  tag         Create a tag TARGET_IMAGE that refers to SOURCE_IMAGE
  top         Display the running processes of a container
  unpause     Unpause all processes within one or more containers
  update      Update configuration of one or more containers
  version     Show the Docker version information
  wait        Block until one or more containers stop, then print their exit codes